Friday, December 18, 2009


One of our favorite employees, Rosie and her mom Laura have been chosen as finalists in a contest sponsored by Better Homes and Gardens...folks have to register to vote at the website and then vote for them and they are behind!!!
The Website isn't the most user friendly but these are the instructions that Rosie posted for her friends!

The Finals Voting period is December 16th- 21st.

    * You can vote once per day per log-in
    * Go to the site
    * Look for our team:
VOTE for "A Hoot Garden" by Rosie and Laura
    * Our quilts are pink with owls of course!!! See attached photos.
    * Register to VOTE! Remember your password so you can vote everyday!!!
    * Please note: Step 2 of registration asks for your address- you do not need to provide this info- once you complete Step 1 and create an ID and PW, you are all set to go to the link above and vote!


There are a few steps to take but if you knew Rosie, you would take them happily!!

Wednesday, December 16, 2009

Wow, it has been a wild non stop month. I am back in Florida after closing the books, enjoying Thanksgiving with the family and doing the Foundry in Little Rhody.


Midge and I got rid of so much when we moved that it left us with very little Christmas stuff. So now we have a two foot green foil tree and a cloth wreath that our daughter Sara made. We thought we should step it up a bit because we are having Midgies family here for Christmas dinner with a special visit from our daughter Beth from California.


We didn't wanted go out and consume so we looked around and noticed we had an abundance of paper scraps. Ahh  Haaa ...... paper chains. So we spent last weekend around the dining table equipted with a paper cutter and stapler and worked up about 100 ft of artgirlie chain. We draped it around our living and dining rooms and it added the perfect touch of celebration.


We took a bike ride around the neighborhood to see if we could find some greens we could abscond with to give a boost to our decorating. No luck, there just aren't a lot of pine trees in this neck of the woods. So, you can imagine how happy were to find a night of wreath making with the local native plant society. We arrived to find piles of local flora to make great holiday decor. It was nice to break out of our Yankee box and make old things with new material.


Midge made a center piece for our holiday table and I made a wreath. We had a great time, met some like minded people and will be looking forward to future Florida holiday decorating with new eyes.

Monday, November 30, 2009


With Trees being an important icon for many folks this time of year, we have come up with a couple of variations to add to your creative collection. Variations on the theme are easy.


STRIPPY TREE
• Make yourself a pile of fabric strips, just ripped apart...1/4 to 1/2 inch wide and 3 inches long or so.

• Starting at the top of the cone, wrap a piece of string or yarn around the cone to determine the length of your finished strip wrap.

• Sew the small strips onto the long piece to create a fringe.


• Once you have finished your long piece of fringe, start at the top point and attach to the green cone. You can stitch or glue this step. Check photo at the top of the page.
• Felt beads added to the fringe add more color and texture. Just place the tree on  a dowel or stick to create a trunk. This beauty has an embellished  stitched star at the top! I placed our tree trunk in a jar filled with colorful beads.


• FOR ANOTHER LOOK, try zig zagging 3 or 4 lengths of yarn together.
• Using the long strip as a base, tie or stitch yarn fringe along the length.
• Embellish yarns with wool felt beads and sequins.
• Tie pieces around the tree.
• Cut a piece of cardboard or foam core to create a circle that will fit inside the bottom of the cone. This will keep the tree base "round".  Make a hole in the center about the size of a pencil.
• Drill a hole in a small wooden round to create a "trunk" with a small straight stick or dowel. Secure dowel in the base.
• Place trunk through the hole in the bottom and set the tree onto the trunk.
• Place embellished yarn on the tree.
• Top off with felt star!
• Make another one and enjoy.

LITTLE PINS

Our Artgirlz Mini Tree Pin Kits come with all of the goodies needed to make an embellished tree pin. Or, mix things up by making simple little trees with Artgirlz Mini Cones and a piece of twig! Green, purple, red...trees of many colors!

Tuesday, November 24, 2009


I decided to put a piece together using our 4"x4" felt squares. The felt is actually a variety of blends of rayon and wool...depending on the color. I decided to make six simple shapes and put them together to create a hanging decoration that could hang on your door, the wall, or in a window.

• Pair the colors together. Just move them around until you are happy with the combos.
• Use colored pencils to draw the shapes onto the felt once you've decided on your colors.
• Set the sewing machine on a medium width tight zig zag.
• Stitch around your shape leaving an opening for stuffing.


• Trim around your finished shape. You can cut a decorative border shape, use pinking shears or just create a clean cut around the zig zag.


• Stuff your shapes lightly with polyfil. Finish stitching around the shape. 


• Use your longest needle to go through each shape adding wool felt beads between each piece.
• These of course could be embellished for dayz with beads, sequins, fibers, bells and whistles!!
• Rather than string them together, use them as decorations for your tree or fancy tags for packages.

LINDA'S HAND WORK

 Miss Linda in all of her wisdom made up some shapes out of recycled cardboard.
She cut out her felt shapes and proceeded to stitch them together with a very wonderful blanket stitch.
As usual, her layering and textured stitching make for a wonderful little felt nugget! This piece includes a small felt bead and flower.
Monday, November 23, 2009

Name Tags for Your Holiday Table!


If you are having a dinner anytime soon, you might want to make some place cards like these great pieces that Linda Willis..."our" Linda...whipped up! She collected some hand made paper, Artgirlz scraps, wool felt beads, wool flowers, fibers and beautiful old fabric leaves. She mixed and matched all of the ingredients and came up with three examples.
You could mix and match styles...make multiples of the same style. They will add texture to your table and will help guide friends and family to their assigned seats. 

Friday, November 20, 2009

 Stockings, Stockings, Stockings!!!


We are going to share a pattern, images and tips for making some Artgirly Holiday Stockings! The piece shown above is made with Artgirlz Patchy Fabric and lined with a piece of cotton. This gives the stocking an interesting surface with visual interest and texture. The top was folded down with an added beaded fringe. One of the nice things about this shape, is that it can be made up in any size and used as table decorations, or super sized for the mantle!

By stepping out and using some non-traditional fabrics you can twist the feel of the work. The stocking shown above has a fringe made of small white wool beads and a mix of small glass beads. This particular piece is only 6.5" high with a 2" fold.
The stocking below was constructed out of a piece of black felt and the finished size is 12". By using felt, you avoid the necessity of a lining. Just cut your shape, embellish before stitching keeping the edges clear for stitching the two sides together. The body of this piece is embellished with wool flowers and beads. 

 
The other side of the stocking is hand embroidered with standard embroidery thread. The toe and heel are embellished with wool hearts and flowers. The top fringe is constructed with torn strips of of cloth and yarn sewn onto a strip that would fit around the top of the stocking. The strips are further embellished with wool felt beads.

Al made this Super Duper Santa Friendly Stocking that measures 20" long and 10" across the top! You could expect a load of goodies to fill this puppy! The best part of this piece is the snow people and cloth bead fringe around the top cuff.
 
To make the beads, just roll scraps of your patchy fabric and wrap with wire, metallic threads or ribbon. They can be as long or short as you want. Simple or complex...


Wednesday, November 18, 2009


Well Allison flew in from Florida yesterday and we all arrived at Artgirlz World Headquarters around dinner time. Lots of work to do to prep for the Foundry Show that opens in a couple of weeks. Since Thanksgiving is just around the corner and most of us will probably be setting tables and feeding friends and family, Linda whipped up this very easy and very colorful Napkin Wrap!


She used a strip of cotton that was stitched ( 12-15 inches), turned right sides out as the base. To eliminate the machine sewing step, you could also use ribbon or trim.

Gather your fancy yarns and fabric scraps (tear strips) and make a pom-pom. Stitch the yarn bunch onto the middle of your tie and add a wool felt bead or two by going up through the middle of the bead and back down to the tie.

Repeat to secure the layers and you will have yourself a very festive addition to your table!!

Any non-traditional Thanksgiving festivities going on out there?

Thursday, November 12, 2009


I am trying to keep all of the jiggly feelings that arise this time of year at a distance. One of the things that can bring them on is preparing for our The Foundry Show. It is always stressful. This year we thought we were set because we had the same booth space as last year. We didn't have to reinvent our booth. No problem. This week as Tracy left the last foundry meeting, one of our fellow artists screamed across the room "Oh, we changed your booth space." Damn it! Back to the drawing board.


I always need a project to do while I watch bad reality TV or a Patriots football game. God forbid I rest and relax. Recently the project has been sewing a lot of Curious Mind and Menopausal Maven pins for the foundry. So to take a break from that, I started needle felting polka dots on beads. I added polkadots to different sizes and colors. Last week I incorporated them in a necklace.


To make the necklace I sewed three pcs of yarn together with a zig zag stitch to string them on. I made enough for three strands. For a wider strand with more texture you need to make sure one of the yarns is bulky.


Give it a try and experiment with different yarns until you get something you like. The rejected ones always get used in another project. I made it long enough so I could just knot the three strands together and still get it over my head and then I didn't have to deal with a closure.
To start building the necklace, I knotted three strands together. I kept adding beads on all three strands at once. Occasionally, I would twist one yarn around the other or string two yarns in one bead. If you give it a try, you need to keep in mind how it will lie around your neck. I gave it a bit of pop by incorporating a strand of black and white "e" beads. To finish it off I just knotted all of the strands together.
Tip: Make your own needle to get the yarns through the beads.  Fold a 12" pc of wire in half, stick it through the bead hole until the wire sticks out of the other end. Put your yarns through the loop and pull them through the bead.


To add another look I embellished the felt beads with seed beads. It makes them look like small lampwork beads.


I used the same technique to make a bracelet only I added a closure.
Voila! ...an ensemble.

Wednesday, November 04, 2009


I just spent 45 minutes trying to figure out how to get a Twitter and Facebook link onto this blog and I feel like I have fallen into the dark ages because I can't seem to get it. So I will move on with the day and do things that I already know at the moment!!
We received this wonderful photo of the charm bracelet from Lezette Thomason last week!!! We met Lezette in Chicago last Feb at a gathering of Bernina Teacher Reunion. She designs children's clothing and has written books about smocking, crazy quilting, doll clothes. Her talents are clearly much wider than the world of kiddy clothes!! Thanks for the beautiful work!!

Neighbor, friend and artist Kate Bussey stopped by last week and bought some roving. The next day I found these wonderful little acorns hanging on my door! If you are in the Southern New England area, her little store... Mills Creek Natural Market 4436 Old Post Rd, Charlestown, RI is a wonderful collection of handmade, organic lotions, clothing, jewelry and munchies!


Off to World Headquarters to continue organizing and making things up. Blogspot seems to have a new editing format and where is the $#@& spellcheck???

Friday, October 30, 2009


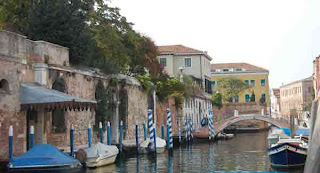
I am almost back to normal from my trip to Venice, Italy. Midge and I went for about a week and it was just incredible. Every where we looked or traveled was filled with awe inspiring age and beauty. It was so magical it gave you a feeling of Disney but the good news was it was all very real.


We were lucky to find an apartment to rent from HomeAway.com, so we had our very own Venice studio. It was in a perfect neighborhood with a canal and bridge just outside our window.

 The studio was in the Dorsoduro section, away from 
the hustle and bustle of tourists and it was just a short block 
from a sunset walk along the Zaterre.
It was dreamy.
Our little studio had a full kitchen so we shopped at the local market and cooked at home while we watched the world go by on our bridge.


The city is all about water. 
There are no cars.
Everything is delivered by boat through the canals. Police, ambulance, UPS, postmen and even some markets moved and did all their business on the canals. 

 
We spent hours walking from place to place, enjoying being lost and then finding our way. It seemed that every turn held some new, but incredibly old site to take in. We went from museum to museum trying to take it all in so we would remember it all when we were back home. It was a biennial year so there was modern art everywhere. The contemporary art displayed through the old city was quite wonderfully paradoxical. 


It was a fantastic trip of a life time and I can't wait to do another one!

Friday, October 23, 2009

October 7th I took off with my car filled with Artgirlz goodies and headed for Cromwell, CT and a weekend of learning, sharing and fun at Art Is...You. We weren't officially on the teaching list because we thought that we would at this years Quilt Market...but we weren't and off I went to assist our Linda Willis with her classes, make new friends, sell a few Artgirlz goodies and to take a wet felting class with the amazing Nicole Chazaud Telaar. Her blog is filled with more wonderful color and delicious visuals!!
Linda's Classes went very well...folks were excited, doing great work, and most importantly pleased with themselves. We had a lot of laughs, shared stories, met new best friends and urged people to trust their visions!

I was very excited about taking a one day felt flower making class. The morning of the class I had the privilege of talking with Nicole at breakfast. We shared biz stories and experiences and hope to do some skill sharing sometime soon! The class was set up by the hotel pool and under the glass dome, giving the feeling of a tropical location. The first task was to make a long thin snake shape with little flower buds at the end.

Once that was done, we went on to the bigger flower project. The pictures above show set up for the flowers. It was then combos of water, soap, rubbing, rolling, shaping, oohing and aahing.
We each made flower components and were "supposed" to put it together and bead them in the afternoon. I don't know what I was doing...making more doodles or something...the leaves were made the next day as I peeked in on the Wool Felt Bag Class.

I was very grateful to be taking a class and learning something new. Thanks to all that made it possible!! There are more pictures on Nicole's blog!!!!

Wednesday, October 21, 2009

My sister Beth visited Sue and me last week...here in the lower 48 to visit family. Her youngest son Ben will be going into the US Navy next month. We were charged with the task of making him a necklace. So, we pulled out beads, Artgirlz charms, findings and a long piece of ball chain and proceeded to put a piece together for him.

I wish him the best. To be safe, brave, open, kind.

Tuesday, October 13, 2009

I spent the weekend in my studio challenging myself to make a mini quilt to match a paper project we had done for Ranger. I used the same stamps for both project. I was curious about what I could come up with. The paper project was stamped directly on to painted chip board. But for the cloth project I filled a 9.5" X 11" sheet of paper with Artgirlz inchie stamps and then I copied that onto fabric using my ink jet printer. To truly make your own fabric, you can add paint to the cloth it at this point. I use plain old watered down acrylic paint. It gives a nice water colored effect.


You can stamp directly onto fabric but it is really difficult to get a clear clean image. The fabric I used in my inkjet was a heavier weight and so it absorbed a lot of ink giving the stamps a greyer look. So I would suggest using a finer, lighter weight fabric to get a real dark, clear stamp and it will also go through your printer easier. I backed my stamped fabric with a fusible web. I cut them into tiny squares and ironed them onto larger squares that were also backed with fusible web and then ironed them onto a piece of Patchy fabric. I added a backing, did some simple quilting and attached a binding using my Bernina aurora 440.


To add the finishing touches I ironed a little Artgirl on to the front and added her arms and legs and of course a sparkly petticoat. You can add color to our metal charms with a good gel pen. I used Sakura.
Voila, my mini quilt was done!

Well Baby Beth is visiting Tracy in RI. I wish I was there. But Midge and I are packed and ready to head off to Venice on Thursday. That's not too tough to take.


What are you up to?