

Welcome once again to Artgirlz Nation. We have regrouped at Artgirlz World Headquarters now that the holiday is over.
We are offering a deal on Artgirlz Rubber Stamps! Check out the Artgirlz Special Offer for Almost Everything You Need to Make These Cool Dollz! A $35 value for $25!!!
Get the Free PDF Direction Download to guide you through the steps needed to make little mixed media dolls for yourself and all of your friends and family! So to give you a visual, we have made up some staffer dolls. This crew keeps everything moving along in countless ways!! The hard core includes from top left: Sue, JoAnn, Rosie. Second Row from the Left: Lovely Linda, Jessica and Midge!
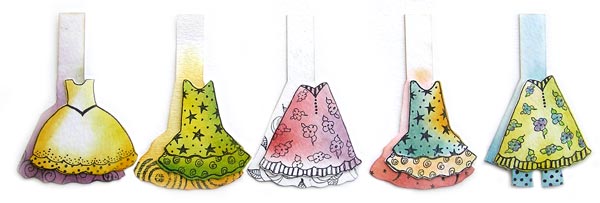
 Using Artgirlz Rubber Stamps, Doll Backs and Charms
Get the Free PDF Direction Download to guide you through the steps needed to make little mixed media dolls for yourself and all of your friends and family! So to give you a visual, we have made up some staffer dolls. This crew keeps everything moving along in countless ways!! The hard core includes from top left: Sue, JoAnn, Rosie. Second Row from the Left: Lovely Linda, Jessica and Midge!
 Using Artgirlz Rubber Stamps, Doll Backs and Charms
Ideas of the steps involved...

The Doll Backs were created to give the girlz more structure and texture. Above is an image of the Doll Back and suggested placement for arm and leg charms. The Doll Backs can be inked, painted, decorated with pens, pencils or stamps.
 The bottom of the Doll Back can be cut to make pantaloons, a curvy or pointy edge.
 Layer the Backs to make a more complex outfit!
Add a piece of lace, ribbon or fabric scrap to create a new layer and added texture.
Again, you can use distress inks, water colors, pencils, glittery embossing
powders or pens to add color and texture to the dress.
Place the dress on top of Doll Back, line them up so that the shoulder of
the dress fits within the edge of the Doll Back, for this is where
they will be held together with the arms and brads.
Depending on the shape of the dress, the Backs will need to be
trimmed to fit the profile of the dress.

Once you have your dress and back decorated, make two holes at the bottom of the Doll Back for the legs. We are very lucky to have a Japanese Screw Punch that makes quick work of hole making. Attach the legs with brads...also refered to as paper fasteners.

With the two layers together, make holes at the shoulder for the arms.
Attach the arms with the brads by putting a brad through the arm
and the two layers of paper. Open the brads in the back to secure.
Glue the head onto the "neck" section of the back!
See the work of Friends of Artgirlz in our Creative Ideas section...
Use your imagination and have fun!
Enjoy! Make another one or two or three!!
Send one to a friend. Prepare them for Halloween or your Holiday tree...


